How to Create a Custom Alfred Workflow using Python
npm Package Search

Welcome to my blog 👋🏽
I'm a Front-End Developer with a passion for learning!
I write about Programming 👩🏽💻 and Productivity Tips ✅
I've written about Alfred in the past, and I am a big fan of its features that help improve my productivity. If you're not familiar with Alfred, the official website describes it as:
... an award-winning app for macOS which boosts your efficiency with hotkeys, keywords, text expansion and more. Search your Mac and the web, and be more productive with custom actions to control your Mac.
One extremely powerful feature of Alfred is workflows. Workflows are a paid feature as part of the Alfred Powerpack. I've found that the money I spent on the Powerpack has been well worth the time saved from being able to leverage these special features. I know that there are lots of workflows available from the open-source community but one day I got curious and decided to dig into how I could create a customized workflow for myself. I noticed that there wasn't a ton of content on how to do this so I decided to do the research and write a blog post on the topic.
In this article, I will provide a step-by-step guide on how to create a custom workflow in Python so you can be equipped to go out and build your own workflows to help boost productivity.
Preview of Workflow
Throughout this blog post, we will be building a workflow titled: npm Package Search. (Yes, the lowercase use of "npm" is intentional since it is what they recommend in their trademark policy. It sure does feel awkward to write it out that way though 🤷🏽♀️) Anyway...
Long gone are the days of manually navigating to the npm homepage to search for a package. With the help of this new workflow, you can quickly and easily search for a package and navigate to its npm page in seconds via Alfred! This workflow is something I created as an efficient way for me to look up a library's npm page so that I can readily locate documentation for new and/or existing packages that I am working with.
If you'd like to leverage this workflow for yourself, I've created the alfred-npm-search repository on GitHub so you can download and import the workflow from there.
Below is a preview of the final product in action.

Create a Blank Workflow
Since we'll be starting from scratch, the first thing we need to do is create a blank workflow. To do this, open up the Alfred "Preferences" and navigate to the "Workflows" tab. At the bottom of the workflows pane, click on the + button and select Blank Workflow.
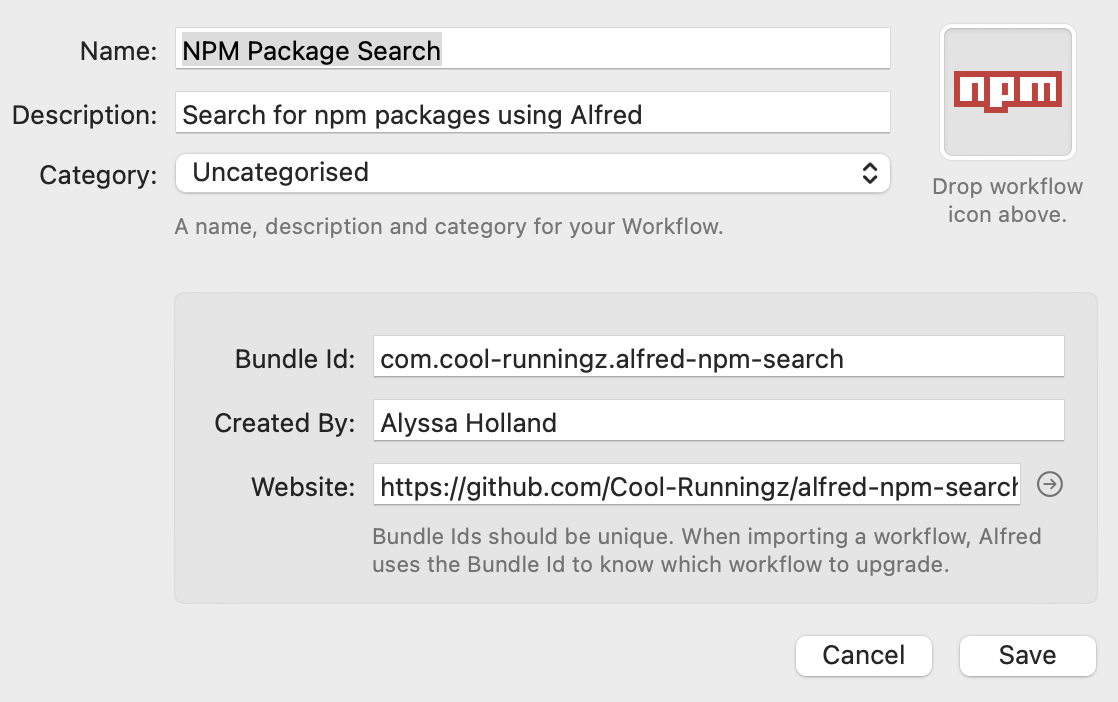
From there, a blank form containing fields about the information and branding of the workflow will pop up. Below is an example of what a filled-out form looks like and how it is displayed within the workflow list.

The last thing to do in this section is to click on the Run Behavior button and alter the "Queue Delay" settings. By default, a workflow will run after each new character is typed. However, in this workflow, we want to change the settings to "Automatic delay after the last character typed." Since the workflow ends up querying the npm API for search matches, having it delayed is beneficial and simulates a debounce effect. Changing this setting ultimately makes the workflow run smoother since it won't fire off an API call after each keystroke.
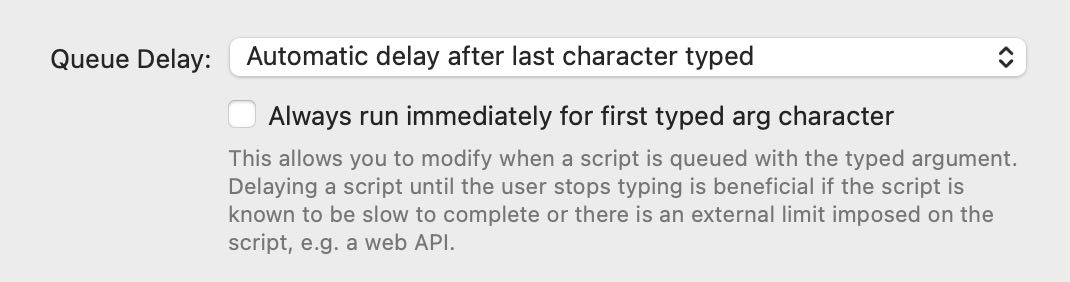 Image of "Queue "Delay" changes within the "Run Behavior" modal.
Open URL Action
Most workflows have an action that will need to run as part of some input that is received. Since the ultimate goal of this workflow is to search and navigate to a specific packages npm page, we can leverage the Open URL action that Alfred provides.
I'm going slightly out of order by describing the action before setting up the input. However, we will soon see how to connect the dots between the two steps.
To add an action in Alfred:
- Right-click in the open area of the workflow ⇒ Select Actions ⇒ Open URL
From there, you will see a modal pop-up and, you will need to enter the syntax {query} as the value for the URL input. {query} will dynamically get filled with the argument you've passed through from the input. I will describe how to set up the input soon but, all you need to know for now is that it will be an npm URL.
- For example, https://www.npmjs.com/package/tailwindcss would be our input value if we had selected tailwind from the list of search results.
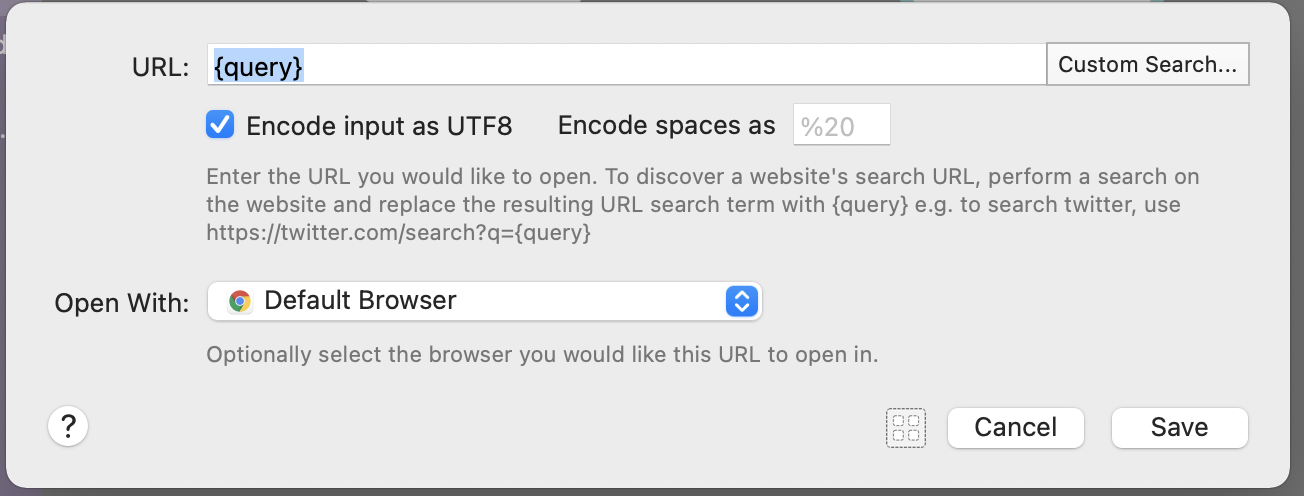 Modal that pops-up after clicking the "Open URL" action.
Script Filters Overview
Before we dive into configuring a script filter, I wanted to take a minute to describe what they are since it plays a critical role in making everything work. Script filters are one of Alfred's most powerful inputs as they give you the ability to populate Alfred's results with custom output.
JSON is the recommended format to return results to Alfred from a script filter and, it must return an items array of zero or more items. Each item in the items array represents a result row to be displayed. You can reference the Script Filter JSON Format page to see an exhaustive list of item properties.
Example JSON Format:
{"items": [
    {
        "title": "Name of npm Package",
        "subtitle": "Description of package",
        "arg": "https://www.npmjs.com/package/tailwindcss",
        "icon": {
            "path": "~/logo-path.png"
        }
    }
]}
Create a Script Filter
Right-click in the open area ⇒ Select Inputs ⇒ Script Filter
From here you will be presented with a modal prompting you to fill out the following fields:
- Keyword: This is the keyword that will be used to trigger the Alfred workflow.
- Placeholder Title: The title that is displayed until the Script Filter is run.
- Please Wait" Subtext: The text that displays while waiting for the initial returned result.
- Language: The language that you want to run the script in.
- Script: The script to run when the workflow is activated. The
{query}will represent the search term that is entered. This will get passed in as an argument to the Python script.
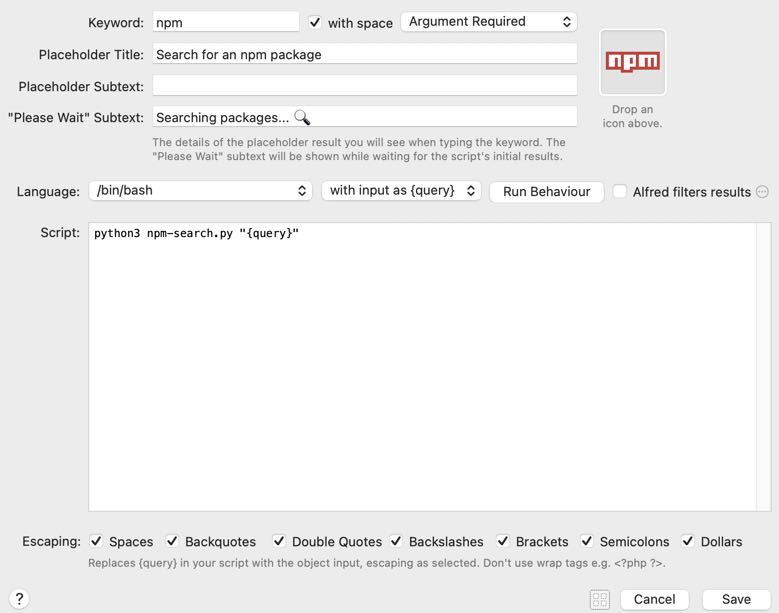 Script Filter form for the npm Package Search workflow.
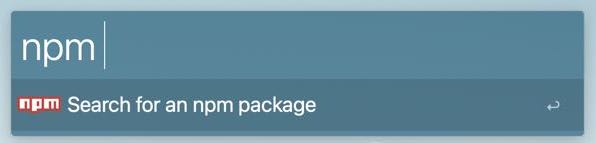
At this point, we have the basics configured and if we attempt to run the workflow, we should see the following output below.
Code Walkthrough
In this section, we will be looking through the Python code that makes everything possible.
import sys
import requests
import json

search_query = sys.argv[1]

NPM_API_URL = "https://www.npmjs.com/search/suggestions?q=" + search_query
- The first three lines of code import the necessary dependencies. sys and json are included as part of the Python Standard Library. requests is a third party library that allows you to easily make HTTP requests. This is a module that we will need to bundle up with our workflow (more on how to do that in the "Bundling Dependencies" section).
- We obtain the user input from sys.argv command and assign it to the
search_queryavailable. - The last line of code builds the full npm search URL by appending the search term and passing it as the query param.
def get_formatted_results(search_results):
    formatted_results = []
    for item in search_results:
        result = {
            "title": item["name"],
            "subtitle": item["description"] if "description" in item else "",
            "arg": item["links"]["npm"],
            "autocomplete": item["name"],
            "icon": {
                "path": "./n-64.png"
             }
        }
        formatted_results.append(result)

    return formatted_results

def get_alfred_items(search_results):
    if len(search_results) == 0:
        result = {
            "title": "No packages found.",
            "subtitle": "Enter in a new search term",
        }
        return [result]
    else:
        return get_formatted_results(search_results)
In an attempt to align with the functional programming and pure function paradigms that I'm most familiar with in JavaScript, I defined two helper functions.
get_alfred_items: This function is called in the main section and handles the execution flow based on the API response. If there were no search matches it returns back an array with a singleresult. If matches were found, it returns the value that is generated from theget_formatted_resultsfunction.- Remember that a Script Filter is required to return an items array of zero or more items so we have to ensure that we handle the empty case scenario.
get_formatted_results: This function is called byget_alfred_itemswhen we have search matches. It properly formats the JSON returned back from the API response into the Script Filter JSON format that Alfred expects.
if __name__ == "__main__":
    npm_search_results = requests.get(NPM_API_URL).json()

    alfred_json = json.dumps({
        "items": get_alfred_items(npm_search_results)
    }, indent=2)

    sys.stdout.write(alfred_json)
This code block contains the main section and facilitates the execution flow of the program.
- The first line within the main section makes an API call to fetch the results and assign it to the
npm_search_resultsvariable. - The next section utilizes the
json.dumps()method to convert a Python dictionary into a JSON string. Thealfred_jsonvariable will have a value in the Script Filter JSON Format that Alfred will be able to parse through. - The last line of code passes the formatted JSON data back to Alfred. Each item within the
itemsarray represents a result row that will get displayed when the workflow is executed from the UI.
Bundling Dependencies
In order to make an API call within our Python script, we had to import the requests library. However, requests is not a part of the Python Standard Library. Due to this, if a user were to download our workflow, it would not work unless they had manually installed the requests library onto their machine beforehand. Because we want our workflow to be compatible for all users, we need to make it so that the requests module comes pre-packaged with the workflow.
Installing requests in the workflow directory
In order to bundle the requests library, we need to install the dependencies within the workflow directory. To locate the workflow directory, right-click on the workflow within the list and click Open in Terminal and Open in Finder.
Within the terminal run the following command to install the module within the current working directory:
pip3 install --target=. requests
After the install completes, we can see that the requests module and its dependencies are within the directory list.
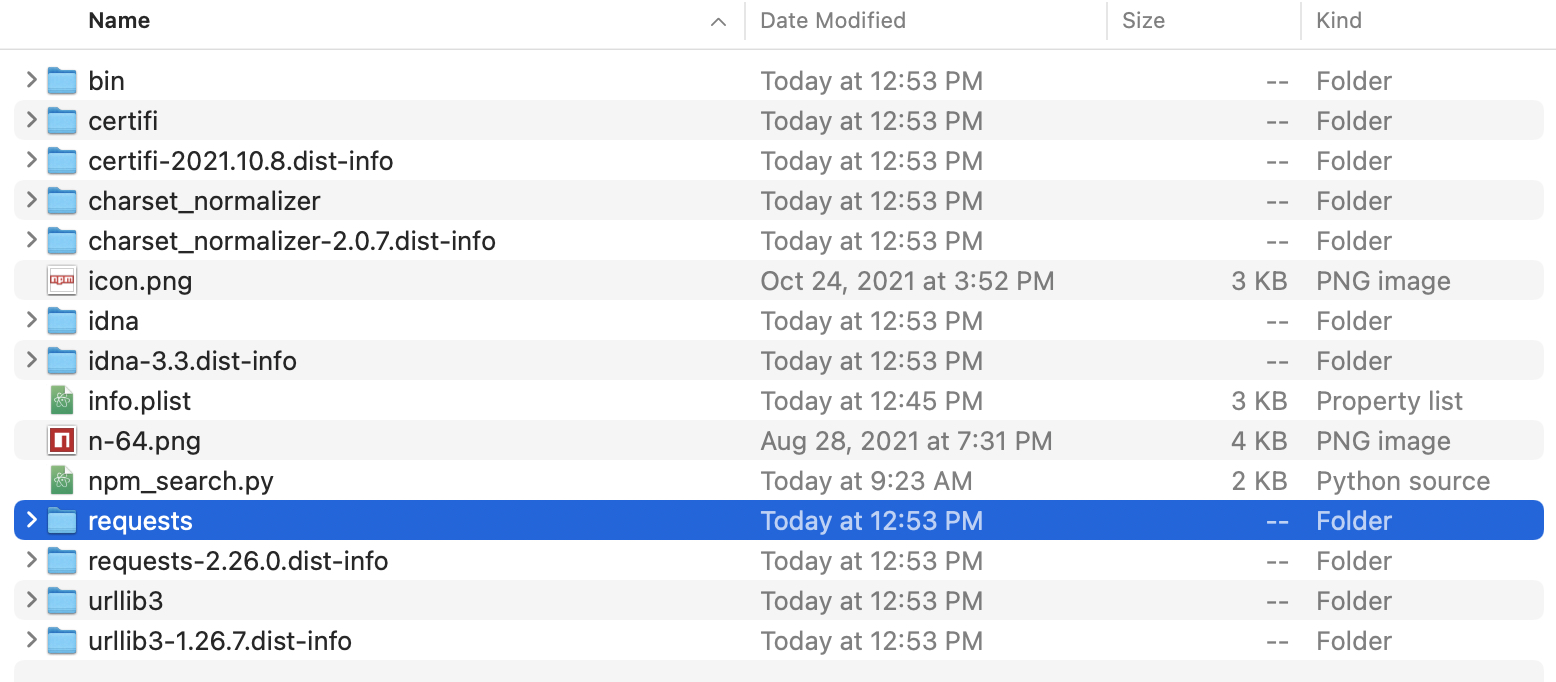
The great part about this is that whenever a user imports our workflow, they don't have to manually install the requests library since it comes pre-bundled. This makes it super convenient to open-source since users can just import the workflow and it will work out of the box 🙌🏽
Final Steps
Now that we have created all the components, it's time to configure all the pieces to wrap things up.
The next thing we need to do is link up the input box with the action box. This makes it so that there is a connection between the two objects. When this connection is created, the input received from the user funnels into the output of opening up the selected package within the web browser.
 Linking the "Script Filter" input to the "Open URL" action.
Now that we have all the pieces connected, here is a demo of the finished workflow.
 Demo of the workflow when no results are found and when selecting a match.
El Fin 👋🏽
I hope this tutorial equips you to go out and build some awesome workflows 🚀 Feel free to share any workflows you've built or fancy using in the comments below.
Don't forget that you can use this workflow for yourself by checking out the alfred-npm-search project I created on GitHub. I also created a word count workflow that someone may find useful 😁
If you enjoy what you read, you might like to read my other blog post on some of the top Alfred workflows I recommend to boost productivity or subscribe to my newsletter, where I write about programming and productivity tips.
As always, thank you for reading, and happy coding!
Resources
- Alfred: Script Filter Input
- https://www.maharsh.net/blog/alfred-workflow-python
- Including 3rd party libraries