Welcome to my blog 👋🏽
I'm a Front-End Developer with a passion for learning!
I write about Programming 👩🏽💻 and Productivity Tips ✅
Introduction
This guide will explain how to set up Medusa in a React application. Medusa is an open source headless commerce engine built for developers. Medusa's composable architecture allows for endless customization and provides a friendly developer experience. React is a popular JavaScript library that provides a declarative and component-based architecture for building user interfaces.
Throughout this tutorial, you will learn how to build a React ecommerce store with Medusa. You will learn how to set up the Medusa server and admin panel and build out some pages to make up the storefront.
The code for the project developed in this article can be found in this GitHub repository.
Prerequisites
To complete this tutorial, you will need:
Node.js version 14.18+ or 16+ installed on your local machine.
One of the following package managers:
npm,yarn, orpnpm(This tutorial will specifically usenpm.)
Set up the Medusa Server
In order to set up the server, you first need to install Medusa's CLI with the following command:
npm install @medusajs/medusa-cli -g
Next, run the following command to install the Medusa server:
medusa new medusa-server --seed
The command above installs the necessary packages and adds the Medusa server to the medusa-server directory. The --seed command populates an SQLite database with sample data that can be referenced from the storefront and admin panel.
Test the Medusa Server
Navigate to the medusa-server folder and start the server:
cd medusa-server
medusa develop
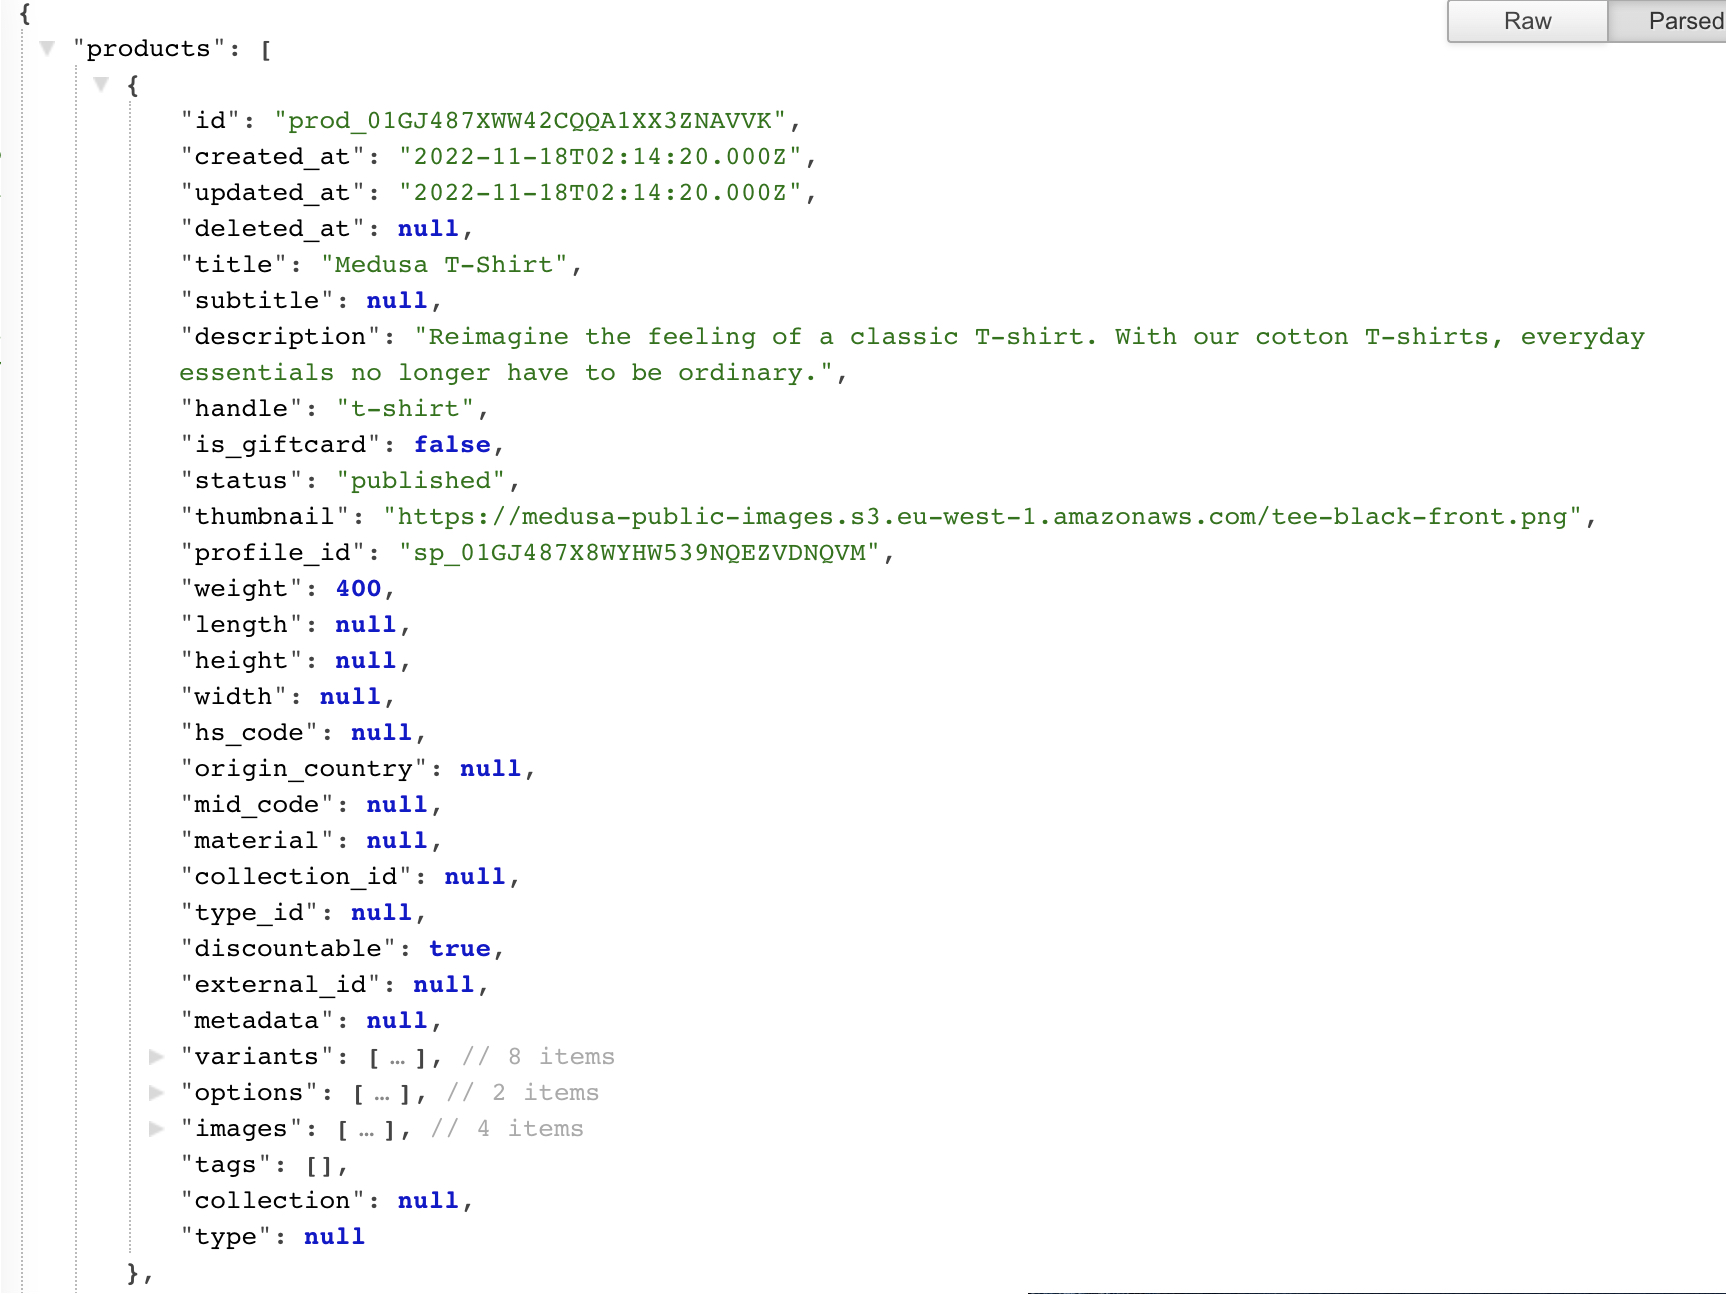
The command above launches the server on localhost:9000.
You now have a complete commerce engine running locally. You can verify that the server is running by going to http://localhost:9000/store/products in your browser. You should see a JSON blob that has the following response:
If you want the ability to upload product images to your Medusa server, you will need to install and configure a file service plugin like S3 or DigitalOcean Spaces.
Setup the Medusa Admin
Medusa provides an admin dashboard with numerous functionalities that equip you to manage your store, including order and product management.
To set up the Medusa Admin, clone the Admin GitHub repository:
git clone https://github.com/medusajs/admin medusa-admin
Change into the cloned directory and then install the dependencies:
cd medusa-admin
npm install
Test the Medusa Admin
Before testing the Medusa admin, ensure that the Medusa server is up and running.
Once the installation of dependencies is complete and the Medusa server is running, execute the following command to start the Medusa admin:
npm run start
You can now view the Medusa Admin in the browser at http://localhost:7000/ where you will be prompted with the following login screen:
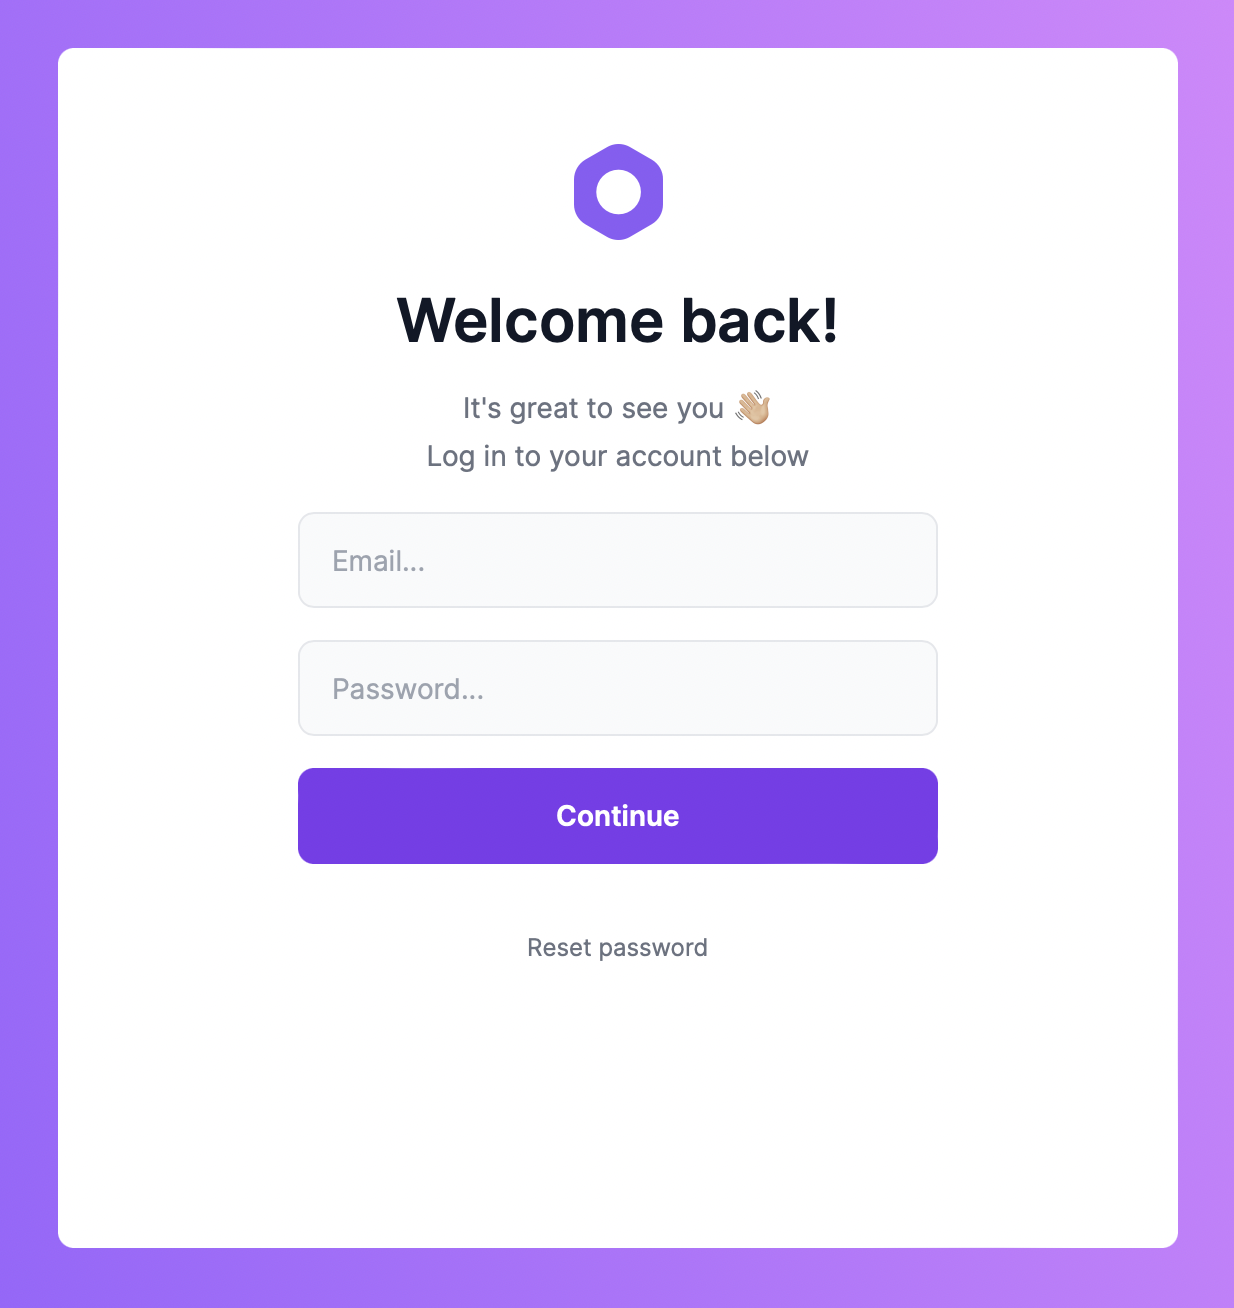
To log in, you’ll need to input the credentials of the demo user that was created when the server’s database was seeded. For the email field, enter admin@medusa-test.com, and for the password field, enter supersecret.
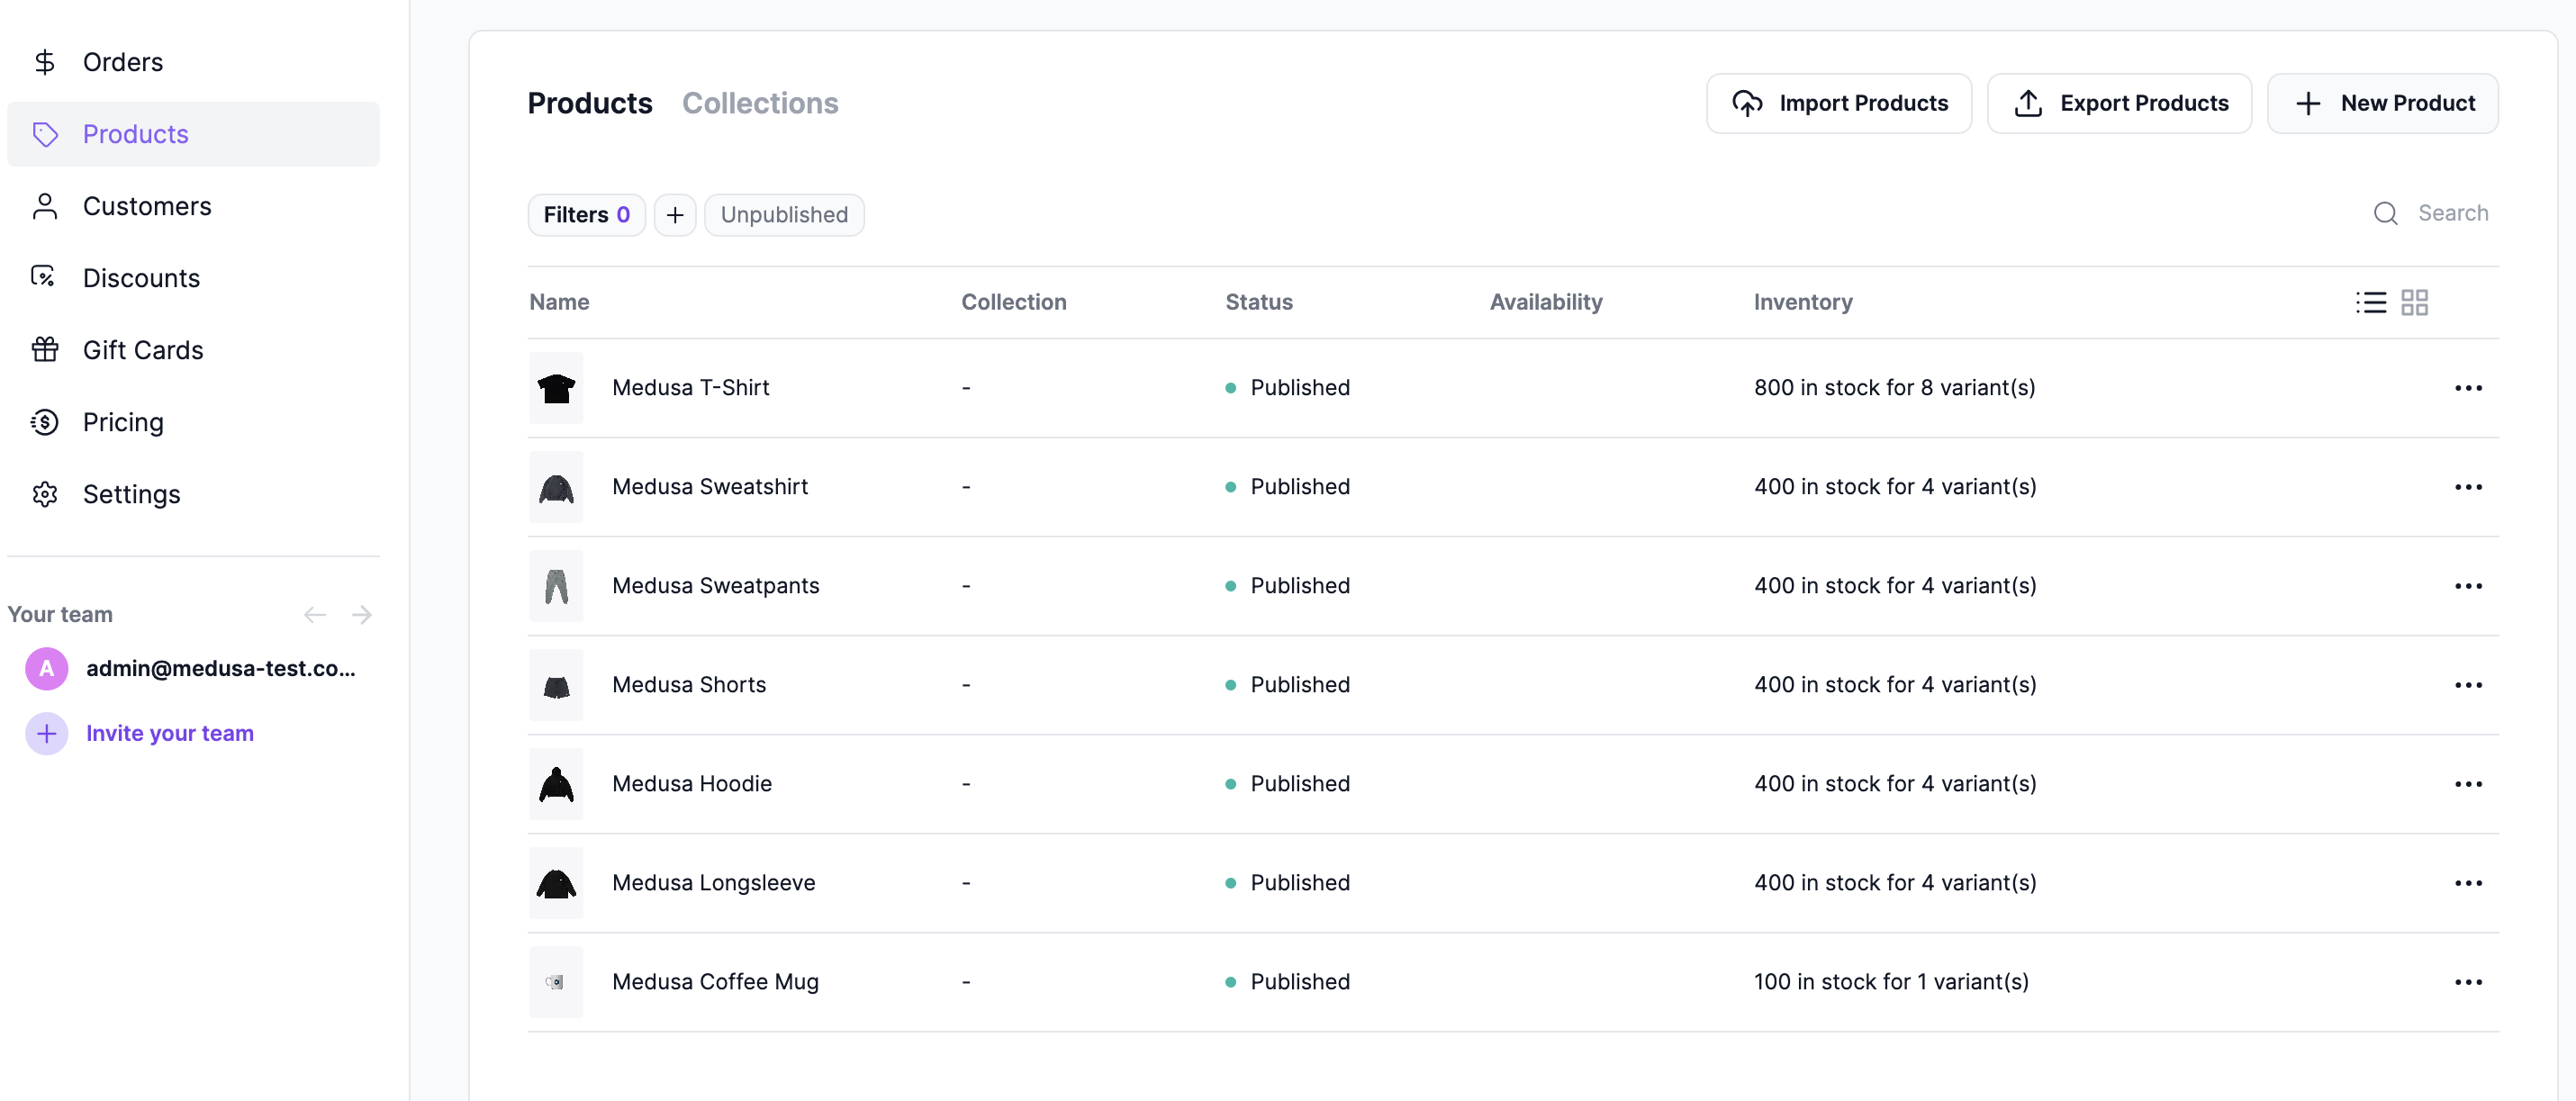
Once logged in, click on “Products” in the sidebar menu. Here, you will see a list of demo products and you can add a few products by clicking on the “New Product” button in the upper right-hand corner.
To learn more about the features and functionalities of the Medusa Admin, check out the user guide.
Setup the React App
In this section, you will scaffold a React application with Vite. Vite is a build tool that aims to provide a faster and leaner development experience for modern web projects and is an alternative to tools like Create React App.
Run one of the following commands to create a Vite app. The command will vary slightly depending on the npm version that you have installed:
# npm version 6.x
npm create vite@latest react-medusa-storefront --template react
# npm version 7+, extra double-dash is needed
npm create vite@latest react-medusa-storefront -- --template react
From here, change into the new directory and install the project dependencies:
cd react-medusa-storefront
npm install
Start the dev server locally:
npm run dev
Navigate to http://localhost:5173/ in your browser and you should now see a screen similar to the one below.

Install React Bootstrap
To assist with styling and building the components for the storefront you will use React Bootstrap. To install, run the following command:
npm install react-bootstrap bootstrap
In order to apply the styles needed for the React Bootstrap library, you need to add the following import to the top of src/main.jsx:
import 'bootstrap/dist/css/bootstrap.min.css';
Update the CSS
Importing the React Bootstrap stylesheet in src/main.jsx applies a myriad of base styles therefore the stylesheet can be trimmed down.
Open src/index.css and replace its content with the following CSS:
:root {
font-family: Inter, Avenir, Helvetica, Arial, sans-serif;
font-size: 16px;
line-height: 24px;
font-weight: 400;
font-synthesis: none;
text-rendering: optimizeLegibility;
-webkit-font-smoothing: antialiased;
-moz-osx-font-smoothing: grayscale;
-webkit-text-size-adjust: 100%;
}
a {
font-weight: 500;
}
a:hover {
cursor: pointer;
}
body {
margin: 0;
min-height: 100vh;
}
Install React Router
In order to enable client-side routing in our app, we will need to install and configure React Router by running the following command:
npm install react-router-dom
Since src/main.jsx is our entry point, we need to import BrowserRouter and wrap the App component within it. Doing so will enable client-side routing for our entire web app.
Open src/main.jsx and replace its contents with the following code:
import React from 'react'
import ReactDOM from 'react-dom/client'
import { BrowserRouter } from "react-router-dom";
import App from './App'
import './index.css'
import 'bootstrap/dist/css/bootstrap.min.css';
ReactDOM.createRoot(document.getElementById('root')).render(
<React.StrictMode>
<BrowserRouter>
<App />
</BrowserRouter>
</React.StrictMode>
)
With React Router installed and configured, we can begin to build out the other pages for the storefront.
Connect the React Storefront to the Medusa Server
The Medusa JS Client is an SDK that provides an easy way to access the Medusa API from a web application. This Medusa JS client is an alternative to interacting with the REST APIs.
Run the following command to install the Medusa JS Client:
npm install @medusajs/medusa-js
Medusa uses CORS to only allow specific origins to access the server. By default, the Medusa server is configured to allow access to the storefront on port 8000. Because the default port for Vite is 5713, you need to configure Vite to point to the desired port number.
To address this, add the server.port option to the vite.config.js file:
import { defineConfig } from 'vite'
import react from '@vitejs/plugin-react'
// https://vitejs.dev/config/
export default defineConfig({
plugins: [react()],
server: {
port: 8000,
},
})
Restart the Vite dev server to reflect the changes made in the config file, and you can now open a new browser tab at http://localhost:8000/.
Create Medusa JS Client Utility
Create a new file at the root of the project called .env and add the following environment variable that points to the URL of the Medusa server:
VITE_MEDUSA_SERVER_URL="http://localhost:9000"
Vite requires all env variables that need to be exposed to the client source code to be prefixed with VITE_ and exposes the environment variable to the client via import.meta.env.VITE_MEDUSA_SERVER_URL.
Create the file src/utils/client.js and add the following code to create a utility that will make accessing the instance of the Medusa JS Client reusable across the application:
import Medusa from "@medusajs/medusa-js"
const medusaClient = new Medusa({ baseUrl: import.meta.env.VITE_MEDUSA_SERVER_URL })
export { medusaClient }
Create the Storefront Components
This section will cover building out the components that will compose the home page of product listings. Here is a list of the components that we will be building in this section:
NavHeader - Displays the logo, links, and shopping cart info.
ProductCard - Displays metadata about the products.
To start, create a new components folder in the /src directory to house all the components we will build for the storefront.
NavHeader Component
Create the file src/components/NavHeader.jsx and add the following code:
import React from 'react'
import { Link } from 'react-router-dom'
import Container from 'react-bootstrap/Container';
import Navbar from 'react-bootstrap/Navbar';
import Nav from 'react-bootstrap/Nav';
import Badge from 'react-bootstrap/Badge';
export default function NavHeader() {
const cartCount = localStorage.getItem('cartCount') ?? 0
return (
<Navbar bg="dark" variant="dark">
<Container fluid>
<Nav className="w-25 d-flex align-items-center justify-content-between">
<img
alt="Medusa logo"
src="https://raw.githubusercontent.com/aholland-work/react-medusa-storefront/main/src/assets/logo-dark.svg"
width="150"
/>
<Navbar.Text className="text-light fw-bold">
<Link className="text-decoration-none" to="/"> 🛍️ Products</Link>
</Navbar.Text>
</Nav>
<Nav>
<Navbar.Text className="text-light fw-bold">
Cart
<Badge bg="success" className="ms-2">{cartCount}</Badge>
<span className="visually-hidden">{cartCount} items in the cart</span>
</Navbar.Text>
</Nav>
</Container>
</Navbar>
)
}
The NavHeader component contains a link back to the home page via the “Products” link and a total count of the number of items that have been added to the cart.
ProductCard Component
In the components directory, create a new file called ProductCard.jsx and add the following code:
import React from 'react'
import { Link } from 'react-router-dom'
import PropTypes from 'prop-types';
import Card from 'react-bootstrap/Card';
export default function ProductCard(props) {
const formattedPrice = new Intl.NumberFormat('en-US', { style: 'currency', currency: 'USD' }).format(props.price / 100)
return (
<Card>
<Card.Img variant="top" src={props.thumbnail} alt={props.title} />
<Card.Body>
<Card.Title>{props.title}</Card.Title>
<Card.Text className='text-success fw-bold'>
{formattedPrice}
</Card.Text>
<Link to={`/products/${props.productId}`}>View Details</Link>
</Card.Body>
</Card>
)
}
ProductCard.propTypes = {
title: PropTypes.string.isRequired,
thumbnail: PropTypes.string.isRequired,
price: PropTypes.number.isRequired,
productId: PropTypes.string.isRequired
};
This component uses React Bootstrap’s Card component to display metadata about each product.
Create the Home Page
The home page is the root route that uses the Medusa JS Client’s list method to pull in a list of products and display information about them using the ProductCard component that was created earlier.
Create a new file insrc/routes/Home.jsx and add the following code:
import React, { useEffect, useState } from 'react'
import Col from 'react-bootstrap/Col';
import Row from 'react-bootstrap/Row';
import ProductCard from '../components/ProductCard'
import { medusaClient } from '../utils/client.js'
export default function Home() {
const [products, setProducts] = useState([])
useEffect(() => {
const getProducts = async () => {
const results = await medusaClient.products.list();
setProducts(results.products)
}
getProducts()
}, []);
return (
<>
<header>
<h1 className="my-4">All Products</h1>
</header>
<main>
<Row xs={1} sm={2} md={3} lg={4} className="g-4">
{products.map((product) => (
<Col key={product.id}>
<ProductCard
title={product.title}
productId={product.id}
price={product.variants[0].prices[1].amount}
thumbnail={product.thumbnail} />
</Col>
))}
</Row>
</main>
</>
)
}
Register the Home Page Route
Next, leverage React Routers Routes and Route components in order to register the pages needed for the react webshop.
Open up src/App.jsx and update it to include the following code:
import { Routes, Route } from "react-router-dom";
import './App.css'
import NavHeader from './components/NavHeader'
import Home from './routes/Home'
function App() {
return (
<div className="App">
<NavHeader />
<Routes>
<Route path="/" element={<Home />} />
</Routes>
</div>
)
}
export default App
With this setup, the NavHeader component will be visible across all our routes and the list of all products can be viewed at the root route.
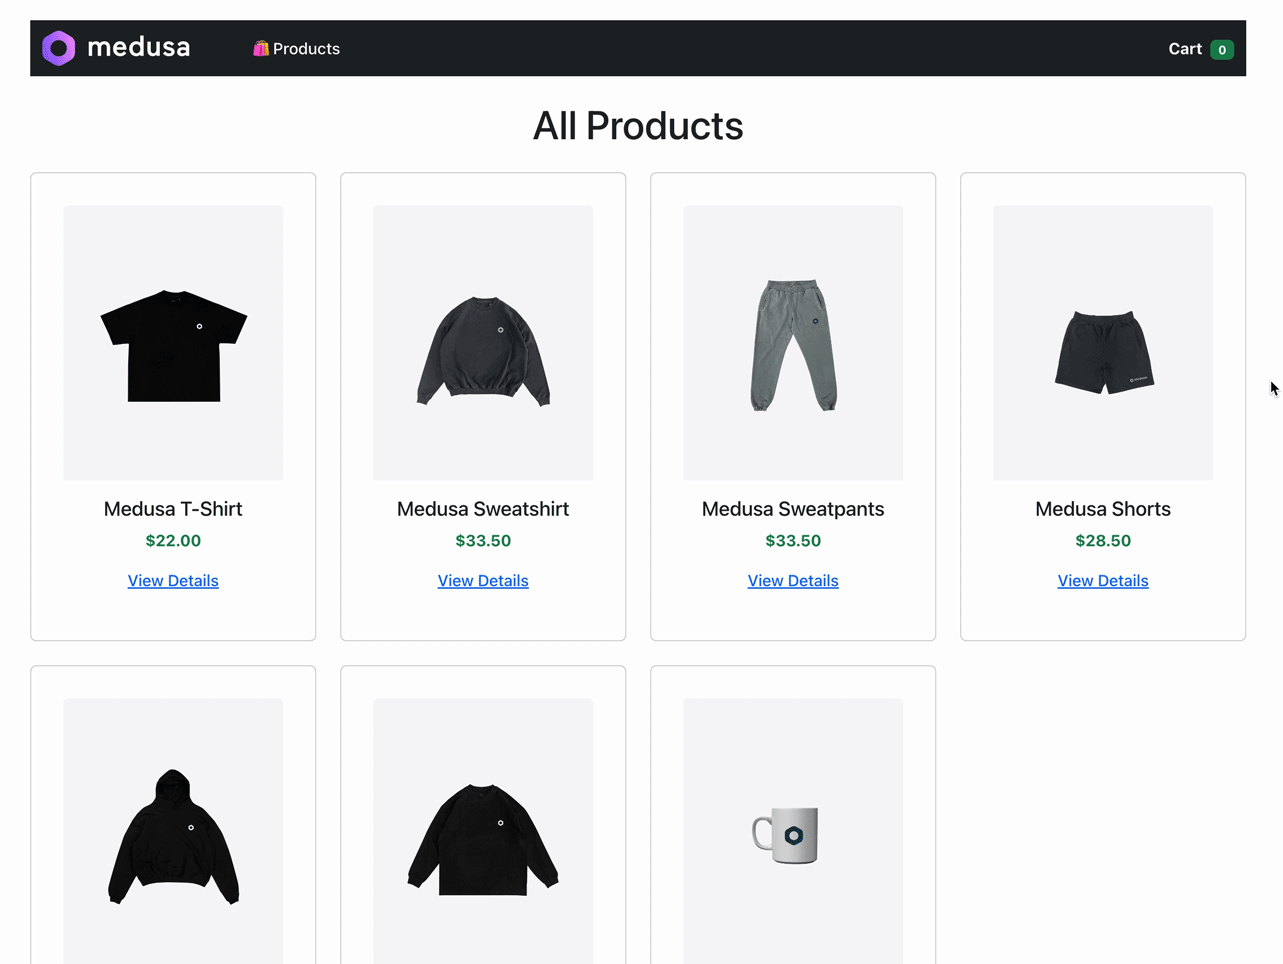
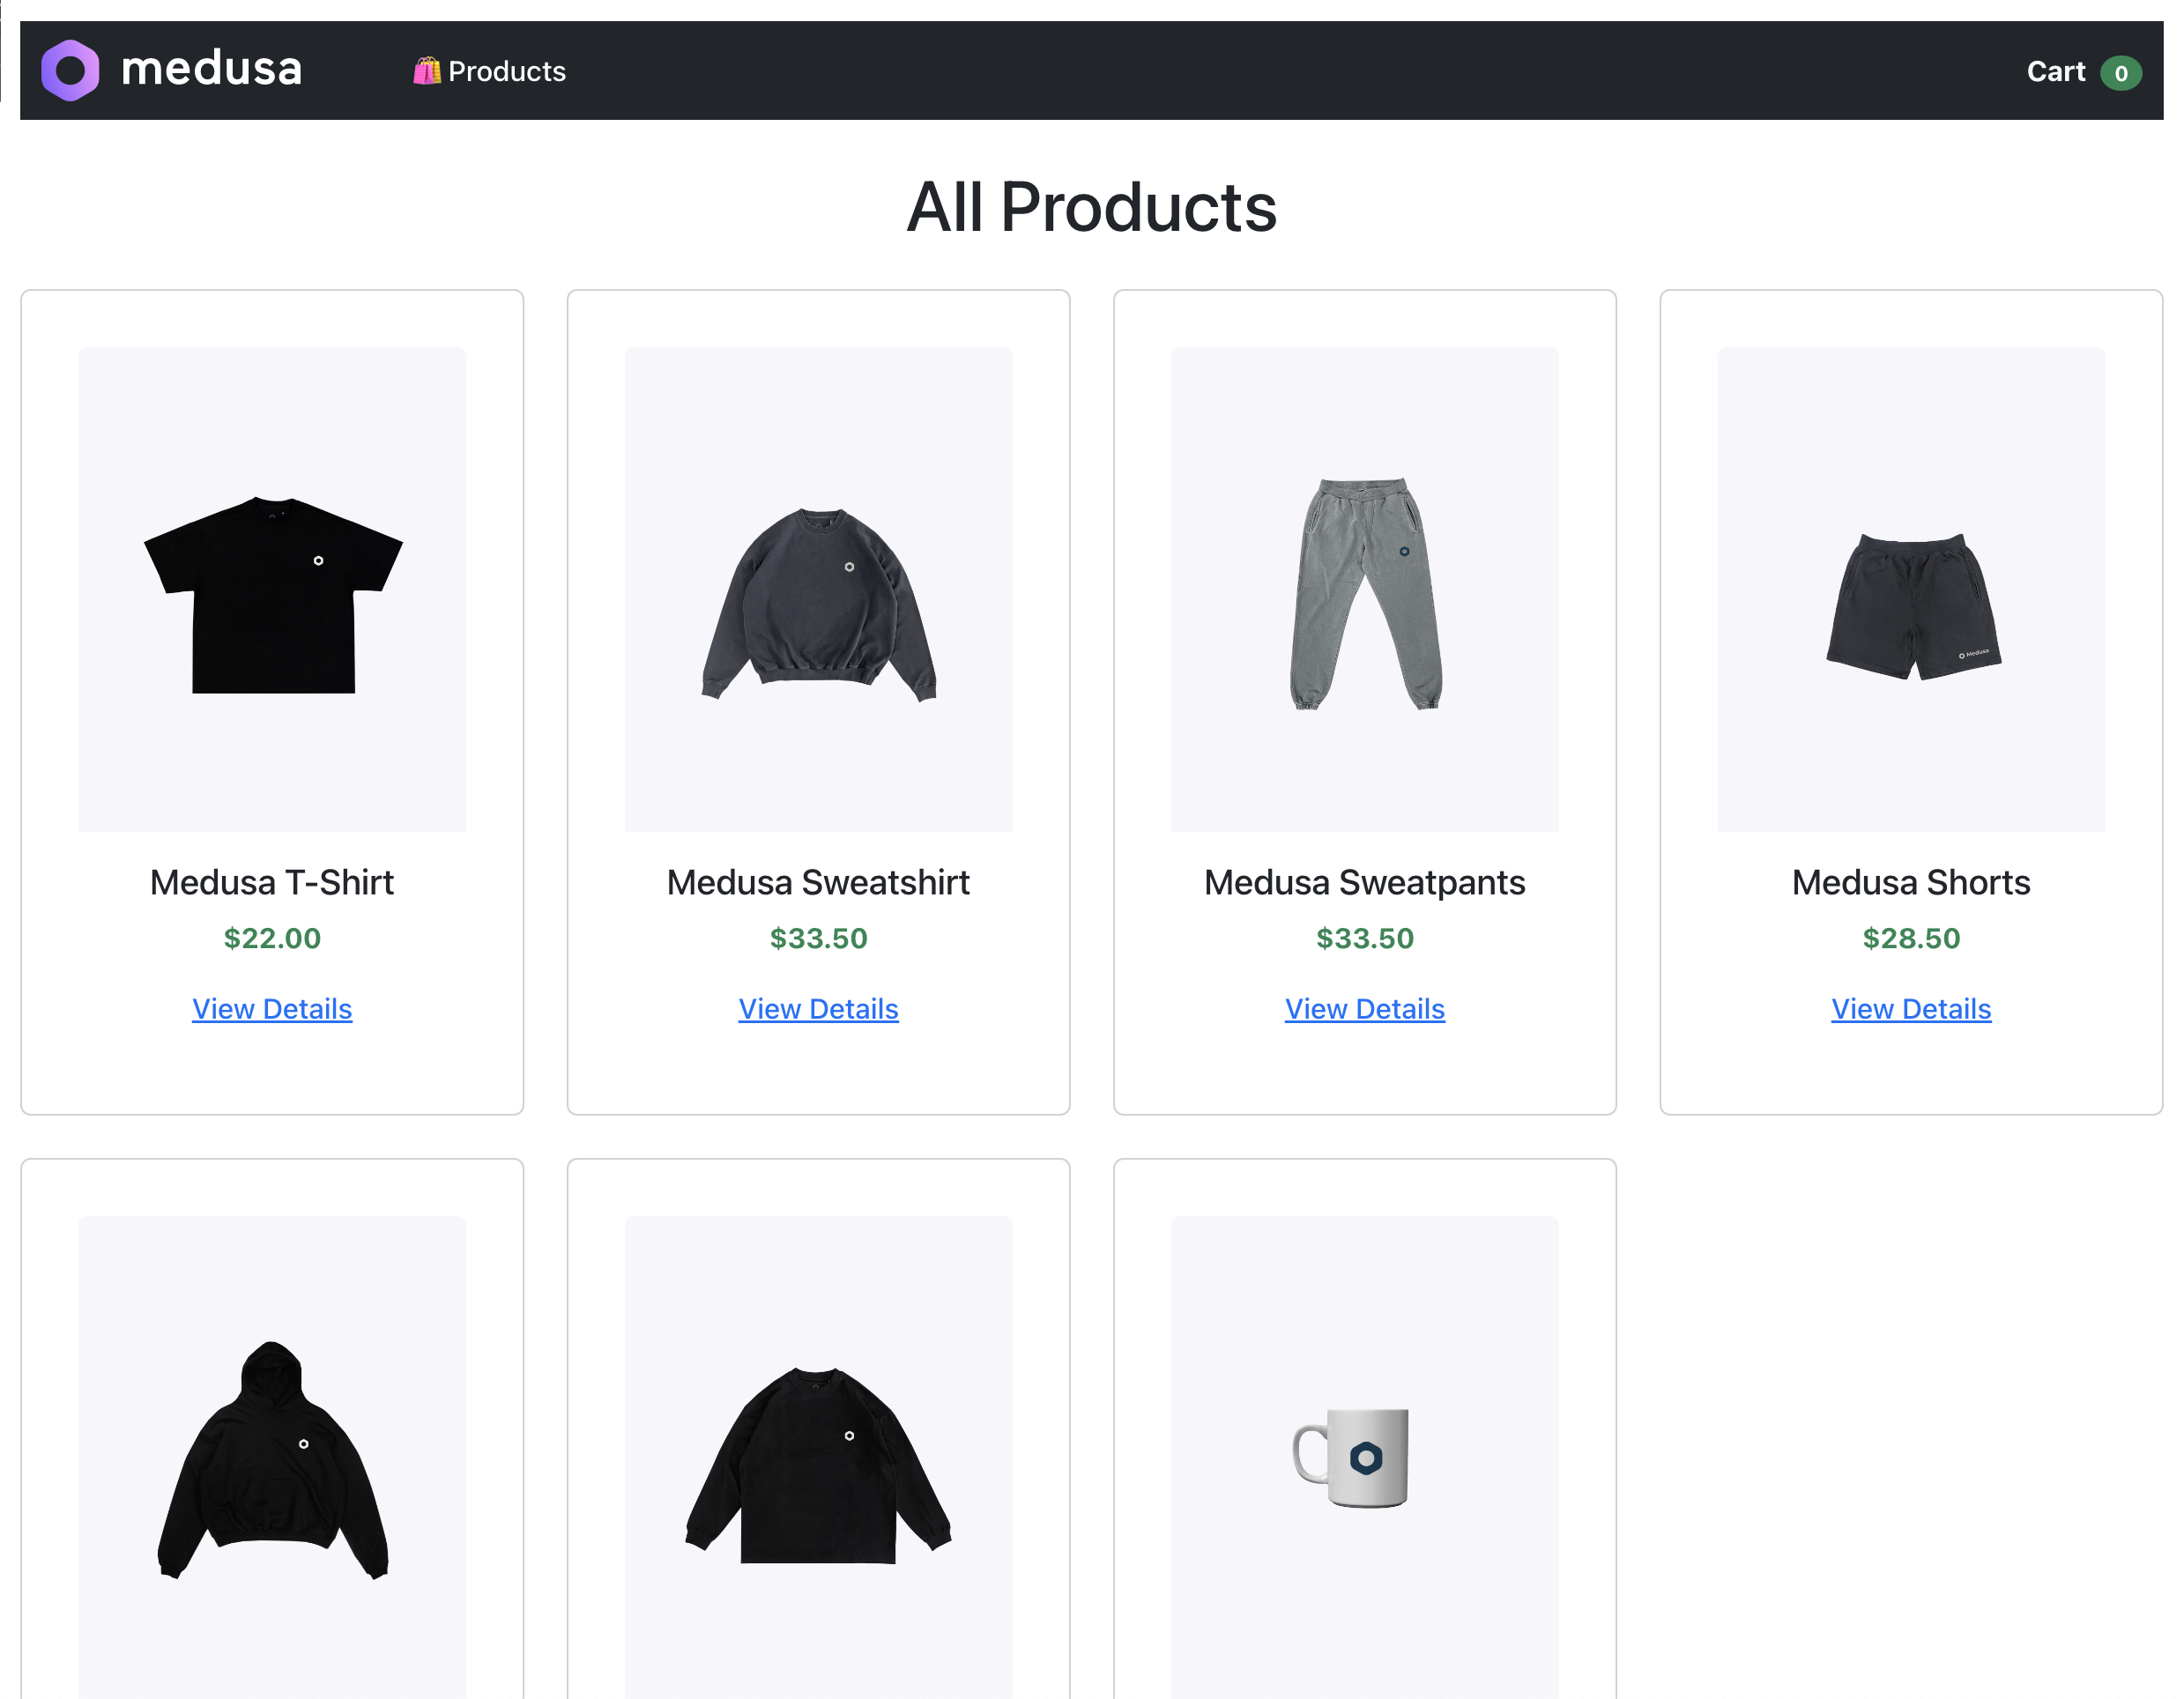
Test the Home Page
Ensure that the Medusa server and the storefront are running and navigate to http://localhost:8000/ to see a preview of the home page:
Create the Product Page
In the routes folder, create a new file called Product.jsx and add the following code:
import React, { useEffect, useState } from 'react'
import { useParams } from 'react-router-dom'
import Container from 'react-bootstrap/Container';
import Row from 'react-bootstrap/Row';
import Col from 'react-bootstrap/Col';
import Button from 'react-bootstrap/Button';
import { medusaClient } from '../utils/client.js'
const getFormattedPrice = (amount) => {
return new Intl.NumberFormat('en-US', { style: 'currency', currency: 'USD' }).format(amount / 100);
}
// TODO: Add functions to handle the add to cart functionality
export default function Product() {
const { id } = useParams();
const [product, setProduct] = useState({})
useEffect(() => {
const getIndividualProduct = async () => {
const results = await medusaClient.products.retrieve(id);
setProduct(results.product)
}
getIndividualProduct()
}, []);
return (
<main className="mt-5">
<Container>
<Row>
<Col>
<img width="500px"
alt={product.title}
src={product.thumbnail} />
</Col>
<Col className="d-flex justify-content-center flex-column">
<h1>{product.title}</h1>
<p className="mb-4 text-success fw-bold">{getFormattedPrice(product.variants?.[0]?.prices?.[1]?.amount)}</p>
<p className="mb-5">{product.description}</p>
<Button variant="success" size="lg" onClick={() => { console.log("Add to cart") }}>Add to cart</Button>
</Col>
</Row>
</Container>
</main>
)
}
This code takes the ID in the URL’s query param and uses the Medusa JS Client’s retrieve method to obtain information about an individual product.
Register the Product Page Route
Re-open src/App.jsx, import the Product page component, and add a new React Router Route that will point to the individual product page:
import { Routes, Route } from "react-router-dom";
import './App.css'
import NavHeader from './components/NavHeader'
import Home from './routes/Home'
import Product from './routes/Product'
function App() {
return (
<div className="App">
<NavHeader />
<Routes>
<Route path="/" element={<Home />} />
<Route path="products/:id" element={<Product />} />
</Routes>
</div>
)
}
export default App
Test the Product Page
To test this out, click on the “View Details” button for the “Medusa Sweatpants” and you will be directed to the product's details page:

Create Add to Cart Functionality
To wire up the logic for the add-to-cart functionality, you need to check if a cart was previously created or not.
For this example, if the cartID is present, then we call the add the line item to the cart and store the cart’s item count in local storage under the cartCount field. If the cartID is not present, then we create a new cart and store the newly generated ID in local storage. The cartCount is used to update the display count in the navigation header.
Re-open Product.jsx in the routes folder and update the file to include the following code:
import React, { useEffect, useState } from 'react'
import { useParams } from 'react-router-dom'
import Container from 'react-bootstrap/Container';
import Row from 'react-bootstrap/Row';
import Col from 'react-bootstrap/Col';
import Button from 'react-bootstrap/Button';
import { medusaClient } from '../utils/client.js'
const getFormattedPrice = (amount) => {
return new Intl.NumberFormat('en-US', { style: 'currency', currency: 'USD' }).format(amount / 100);
}
const addProduct = async (cartId, product) => {
const { cart } = await medusaClient.carts.lineItems.create(cartId, {
variant_id: product.variants[0].id, //For simplicities sake only adding the first variant
quantity: 1
})
localStorage.setItem('cartCount', cart.items.length)
window.location.reload()
}
export default function Product() {
// Get the product ID param from the URL.
const { id } = useParams();
const [product, setProduct] = useState({})
const [regionId, setRegionId] = useState("")
useEffect(() => {
const getIndividualProduct = async () => {
const results = await medusaClient.products.retrieve(id);
setProduct(results.product)
}
const getRegions = async () => {
const results = await medusaClient.regions.list()
setRegionId(results.regions[1].id)
}
getIndividualProduct()
getRegions()
}, []);
const handleAddToCart = async () => {
const cartId = localStorage.getItem('cartId');
if (cartId) {
//A cart was previously created so use the cartId found in localStorage
addProduct(cartId, product)
} else {
//Create a cart if there isn't a pre-existing one
const { cart } = await medusaClient.carts.create({ region_id: regionId })
localStorage.setItem('cartId', cart.id);
//Use the newly generated cart's ID
addProduct(cart.id, product)
}
}
return (
<main className="mt-5">
<Container>
<Row>
<Col>
<img width="500px"
alt={product.title}
src={product.thumbnail} />
</Col>
<Col className="d-flex justify-content-center flex-column">
<h1>{product.title}</h1>
<p className="mb-4 text-success fw-bold">{getFormattedPrice(product.variants?.[0]?.prices?.[1]?.amount)}</p>
<p className="mb-5">{product.description}</p>
<Button variant="success" size="lg" onClick={handleAddToCart}>Add to Cart</Button>
</Col>
</Row>
</Container>
</main>
)
}
The code above adds the following functionality:
addProductasync function that uses themedusaClientutility to add a product to a cart.getRegionsfunction to grab a list of all the regions and set it to the US region found at the first index in theregionsarray. This ID then gets stored in theregionIdstate variable.handleAddToCartfunction that is invoked when the “Add to Cart” button is clicked.
For simplicities sake, the code adds the first variant of a product. This means that a product can only be added to a cart once. In addition, a page reload is initiated in order to pick up the new cart count. This decision was intentional to keep the project simple but know that a real-world app could allow the ability to select different variants and add more advanced capabilities.
Test Add to Cart Functionality
To test out the functionality, click on the “View Details” link for any item to navigate to the product details page. From there, click on the “Add to Cart” button which will initiate a page refresh and update the cart’s badge count in the navigation header.
Conclusion
Throughout this tutorial, you learned about the Medusa Admin, Medusa Server, and how you can use the Medusa JS Client to create a sample ecommerce store with React. A lot of material was covered, however, there is still so much more that you can generate with Medusa such as:
Expanding upon the “add to cart” functionality and building a shopping cart screen that retrieves a cart and displays a list of all the products that have been added to it.
Payment integrations with Stripe.
Should you have any issues or questions related to Medusa, then feel free to reach out to the Medusa team via Discord.